|
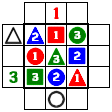
In each of these puzzles, your job is to place every possible combination of the given
shapes and numbers into the grid. No number or shape can appear more than once
in any row or column. Outside the grid are clues to help you. Each clue
indicates the number or the shape in the first square you encounter from that side
going in.
example
Numbers: 1 2 3
solution
|
Numbers: 1 2 3 4
Shapes: circle, square, triangle, star

| 
| 
| 
| ||

| 
| 
| 
| 
| 
|

| 
| 
| 
| 
| 
|

| 
| 
| 
| 
| 
|

| 
| 
| 
| 
| 
|

| 
| 
| 
|
|
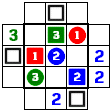
Same problem but with a twist. This time, there aren't enough entries to fill the grid,
so some squares get left blank. These squares are see-through when it comes to clues.
The clue may be referring to the second square in the row or column if the first one is
empty.
example
Numbers: 1 2 3
solution
|
Numbers: 1 2 3 4
Shapes: circle, square, triangle

| 
| 
| 
| ||

| 
| 
| 
| 
| 
|

| 
| 
| 
| 
| 
|

| 
| 
| 
| 
| 
|

| 
| 
| 
| 
| 
|

| 
| 
| 
|


